By Andy Biron
This article will focus on class A pump priming systems and how to maintain and troubleshoot them. First, we need to understand how a “prime” works, and what can help and hinder us during the priming process.
We have two types of primers in the marketplace: rotary vane and air/vacuum. Let’s start with the rotary vane system, which positive displacement pumps use.
Positive displacement, by definition, is: A pump moves a fluid by repeatedly enclosing a fixed volume, with the aid of seals or valves, and moving it mechanically through the system. The pumping action is cyclic and can be driven by pistons, screws, gears, lobes, diaphragms, or vanes.
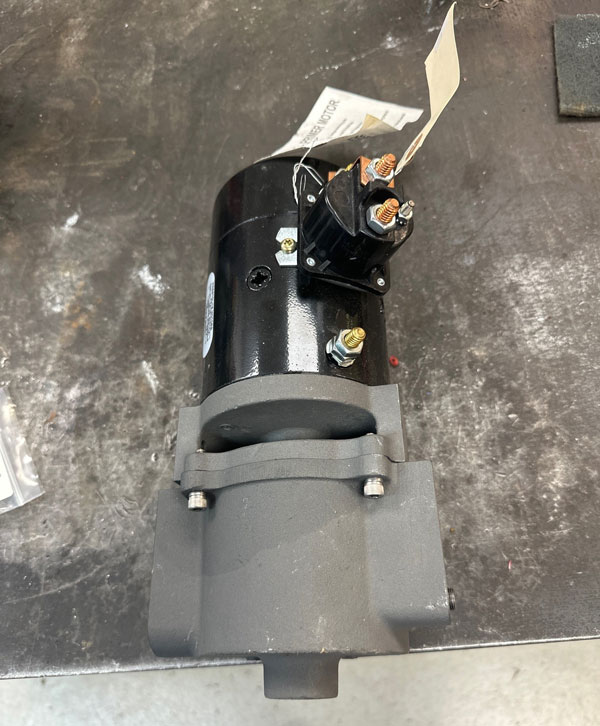
The rotary vanes we use, in layman’s terms, scoop the air out of the primer pump head and create a negative pressure space. This space is then filled in by atmospheric pressure. While we are talking about atmospheric pressure, this is one of the areas that can help or hinder us in the priming process. Think of atmospheric pressure as how hard the area where clouds are seen is pushing down on the surface of the water. On a high pressure day, we could see a very easy “pull” on a draft, and on a low pressure day with the exact equipment and configuration, the draft may be difficult and puzzling to the operators. Does this mean that on the riding list for the day we need to have the current atmospheric pressure? NO. It’s just one of the areas we need to know is part of the puzzle.
Now let’s go over the parts of this system. First, we have plumbing, screens, primer pump head, drive motors, and a hand control valve. This system has a lot of parts and pieces and with that they have a lot of possibilities to affect the draft process in a negative way.
Plumbing: Depending on the original equipment manufacturer (OEM) or a repair, you could encounter compression fittings or the push lock style. Either way both are an area for air to leak by.
Screens: These are a vital part to the longevity of this style of system. Depending on the pump manufacturer, the screen may be accessible for inspection and cleaning annually. Typically, they are found at the start of the plumbing to the primer in the area of the pump body.
Primer Pump: This is the heart of the primer system. This has a lot of moving parts that need exercise weekly if not daily. The major parts are the drum, vanes, body, and bushings. All these parts either rotate when driven by the drive motor or move within the body. Allowing these parts to sit idle is one of the major factors for corrosion to form and hinder the use of the pump head.
Drive Motor: This is the muscle of the pump head. This is what drives all the rotating parts. A high-amperage 12-Volt motor directly drives the drum. Prior to the drive motor is a solenoid that a hand-activated control at the pump panel activates. More on the solenoid later.
Control Valve: The control valve is a bronze or brass device that creates a seal when the priming system is not activated and actively pulling a prime.
Hale and Darley control valves are mounted at the pump panel and include a low-amperage switch that triggers the solenoid for the drive motor.
Waterous has two systems to achieve activation. One is a push/pull rod that physically moves and a valve located on the top of the pump body. This valve has a low-volage switch to activate the solenoid.
The new version/retrofitted valve is a vacuum valve that is spring-assisted and opened by negative pressure in the pump body. When no negative pressure is present, the valve is normally closed.
The solenoid for the drive motor is activated by a low-amperage pushbutton switch on the operator’s panel.
Either way, the valves that seal off the priming system all have moving parts and need to be exercised on a weekly or daily basis.

An air/vacuum primer.
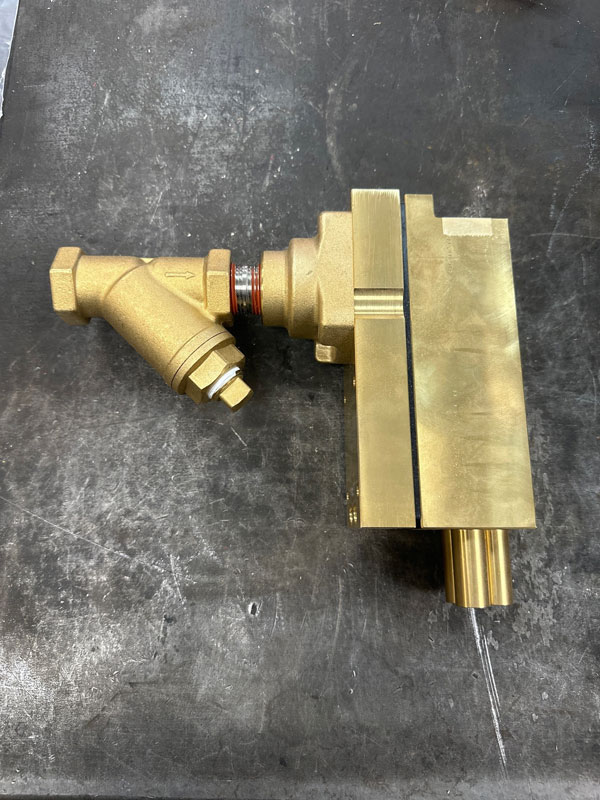
Now let’s look at the air/vacuum system. This system is based on the theory of venturi. By definition, venturi is: a short tube with a tapering constriction in the middle that causes an increase in the velocity of flow of a fluid and a corresponding decrease in fluid pressure and that is used especially in measuring fluid flow or for creating a suction. In layman’s terms, as the compressed air is passing by three stages of cones it creates a negative pressure, and the atmospheric pressure fills this void.
Much like its counterpart of the rotary vane system, it has plumbing, screens, and a control valve. What replaces the high-amperage motor is a vehicle’s compressed air. Again, this system has moving parts and needs to be exercised daily/weekly.
For troubleshooting, we need to replicate the problem with the exact apparatus, operator, and setup. This will not only isolate the equipment issues but also operator’s habits.
Air as seen in bubble form on the intake suction equipment is a major negative factor to keeping a prime. Coupling gaskets and fittings are key areas to look at and repair to make them airtight. More on this with “dry prime” later in the article.
Weak electric drive motors, corrosion in the pump head, or the combination of both are a major factor for rotary vane system performance. For the air/vacuum system, low compressed air supply and corrosion internal to the block affect the performance.
To combat these performance issues, operators must flush these systems on a monthly to weekly basis depending on use frequency. One of the simplest ways is to start the apparatus and NOT put it in pump gear. Open the tank-to-pump valve all the way. Actuate the primer system for no less than 20 seconds. Note the sound and tone of the primer and the amount of water ejected to the ground. Doing this will flush out potential corrosion and foreign material from the screens and moving parts. It’s simple and effective preventive maintenance that keeps the system working.
Dry Prime Test
During the annual pump test, we do what is called a dry prime. These test not only the priming system strength but the airtight qualities of the pump and plumbing around it. To do this test, you must first remove all water from the pump body. A specific small-scale gauge is recommended. This gauge will be connected to the vacuum test port. Next close all valves and make the area airtight. Actuate your primer system until it draws down to a negative 22 inches of mercury. Once you have this number achieved in vacuum, wait five minutes and note the vacuum reading. If you did not lose more than 10 inches of mercury, you can consider this system ready for drafting use.
If you did not achieve the negative 22 inches of mercury, you need to find the are leaks. This can be time-consuming. For discharge valves, a simple trick is to remove any caps or hoses and place a medical glove over the fitting end. Pull a dry prime and note if the glove is sucked back into the pipe. This shows you have a valve leaking by and needs to be repaired.
For tank to pump and tank fill valves that can’t be tested with a medical glove we have another test we perform. Again, start with the pump body dry with all valves closed. This time we are going to take a discharge cap we had modified, add compressed air from an external air compressor ,and pressurize the pump body. Now we can listen for air bubbles in the apparatus water tank and diagnose what valve is leaking.
The last items to check with a dry prime are your suction tubes. To check these, we need to again start with a dry pump cavity and connect a single suction tube to the pump intake. With a piece of rigid material or a cap, block off the male end and make it airtight. Activate your priming system and draw down to 22 inches of mercury. Look for the leaks in the tubes, couplings, and gaskets. A quiet area will help to listen for the air being pulled by a leak. DO NOT pressurize these tubes as a form of testing, doing so will cause them to fail.
ANDY “SIPPY” BIRON retired from the City of Manchester (NH) Fire Department in 2023 after 22 years of line firefighting service. For the past nine years, he has been an EVT for W.D. Perkins Fire Pump Specialist based in Bedford, New Hampshire.


